Background Jobs
Asynchronous Processing with Real-Time Updates
In this section, we’ll integrate background job processing with WebSocket communication. This powerful pattern allows you to offload long-running tasks from WebSocket connections while providing real-time updates when jobs complete.
Understanding Background Jobs with WebSockets
The Challenge: WebSocket connections should remain responsive and not block on long-running operations like AI processing, file uploads, or external API calls.
The Solution: Use background workers to process jobs asynchronously while maintaining real-time communication with clients through channel layers.
- Key Benefits:
Non-blocking: WebSocket stays responsive while jobs run in background
Scalable: Multiple workers can process jobs concurrently
Real-time Feedback: Clients receive results immediately when jobs complete
Cross-process Communication: Workers and WebSocket servers can run on different machines
- Architecture Overview:
Client sends message to WebSocket consumer
Consumer queues a background job and responds immediately
Background worker processes the job asynchronously
Worker sends results back to client via channel layers
Client receives real-time updates when job completes
Understanding sync_to_async and async_to_sync
When integrating async WebSocket consumers with sync background workers, we need utilities to bridge the synchronous and asynchronous worlds:
- async_to_sync: Converts async functions to sync (mainly used here)
Background workers are typically sync functions
Channel layer operations are async, so we wrap them with
async_to_sync()Example:
async_to_sync(channel_layer.send)(channel_name, message)
- sync_to_async: Converts sync functions to async
Used when calling sync database operations from async consumers
Example:
await sync_to_async(User.objects.get)(id=user_id)
Both utilities come from asgiref.sync and are essential for mixing sync/async code in Django-style applications.
Creating Background Tasks
First, let’s create our background task definitions. Create a new file at sandbox/tasks.py:
Background Tasks Code
"""
Background tasks for the sandbox application.
"""

import time
from typing import Any

from asgiref.sync import async_to_sync
from fast_channels.layers import get_channel_layer
from redis import Redis
from rq import Queue

from sandbox.layers import setup_layers

# Setup channel layers when this module is imported
setup_layers()

# Redis connection for RQ
redis_conn = Redis(host="localhost", port=6399, db=1)  # Use different DB than channels
job_queue = Queue("background_jobs", connection=redis_conn)


def translate_text(job_id: str, content: str, channel_name: str) -> dict[str, Any]:
    """
    Simulate text translation task.
    """
    time.sleep(2)  # Simulate API call delay

    # Simple mock translation
    translations = {
        "hello": "hola",
        "world": "mundo",
        "good morning": "buenos días",
        "thank you": "gracias",
    }

    translated = translations.get(content.lower(), f"[TRANSLATED: {content}]")
    result = f"🌍 Translated: '{content}' → '{translated}'"

    # Send result back through channel layer
    _send_result_to_client(channel_name, result)

    return {"status": "completed", "result": result, "job_id": job_id}


def analyze_text(job_id: str, content: str, channel_name: str) -> dict[str, Any]:
    """
    Simulate text analysis task.
    """
    time.sleep(3)  # Simulate processing delay

    # Perform analysis
    word_count = len(content.split())
    char_count = len(content)
    vowel_count = sum(1 for char in content.lower() if char in "aeiou")
    consonant_count = sum(
        1 for char in content.lower() if char.isalpha() and char not in "aeiou"
    )

    result = (
        f"📊 Analysis of '{content}':\n"
        f"• Characters: {char_count}\n"
        f"• Words: {word_count}\n"
        f"• Vowels: {vowel_count}\n"
        f"• Consonants: {consonant_count}"
    )

    # Send result back through channel layer
    _send_result_to_client(channel_name, result)

    return {"status": "completed", "result": result, "job_id": job_id}


def generate_response(job_id: str, content: str, channel_name: str) -> dict[str, Any]:
    """
    Simulate AI response generation.
    """
    time.sleep(4)  # Simulate AI processing

    # Simple response generation based on keywords
    if "weather" in content.lower():
        response = "The weather is looking great today! Perfect for a walk outside."
    elif "food" in content.lower() or "eat" in content.lower():
        response = "I'd recommend trying that new restaurant downtown. Their pasta is excellent!"
    elif "help" in content.lower():
        response = "I'm here to help! Feel free to ask me anything you'd like to know."
    else:
        response = f"That's an interesting point about '{content}'. Let me think about that... Based on my analysis, I would suggest exploring this topic further through research and practical application."

    result = f"🤖 AI Response to '{content}':\n{response}"

    # Send result back through channel layer
    _send_result_to_client(channel_name, result)

    return {"status": "completed", "result": result, "job_id": job_id}


def process_default(job_id: str, content: str, channel_name: str) -> dict[str, Any]:
    """
    Default processing task.
    """
    time.sleep(1)  # Quick processing

    result = f"✅ Processed: {content.upper()}"

    # Send result back through channel layer
    _send_result_to_client(channel_name, result)

    return {"status": "completed", "result": result, "job_id": job_id}


def _send_result_to_client(channel_name: str, message: str):
    """
    Send the result back to the WebSocket client through the channel layer.
    """
    try:
        # Get the chat channel layer (same as used by BackgroundJobConsumer)
        channel_layer = get_channel_layer("chat")

        # Use asgiref to convert async call to sync
        async_to_sync(channel_layer.send)(
            channel_name, {"type": "job_result", "message": message}
        )

    except Exception as e:
        print(f"Error sending result to client: {e}")


# Job dispatcher
JOB_FUNCTIONS = {
    "translate": translate_text,
    "analyze": analyze_text,
    "generate": generate_response,
    "default": process_default,
}


def queue_job(job_type: str, content: str, channel_name: str) -> str:
    """
    Queue a background job and return the job ID.
    """
    if job_type not in JOB_FUNCTIONS:
        job_type = "default"

    job_func = JOB_FUNCTIONS[job_type]
    job = job_queue.enqueue(
        job_func, job_type + "_" + str(int(time.time())), content, channel_name
    )

    return job.id
This tasks file provides:
Multiple Job Types: Translation, text analysis, AI response generation, and default processing
Redis Queue Integration: Uses RQ (Redis Queue) for job management
Channel Layer Communication: Jobs send results back to WebSocket clients using
async_to_syncJob Dispatcher:
queue_job()function routes different job types to appropriate handlersError Handling: Graceful handling of channel layer communication errors
- Key Components:
JOB_FUNCTIONS: Maps job types to processing functions_send_result_to_client(): Uses channel layers to deliver results back to WebSocketsetup_layers(): Ensures channel layers are available in worker processes
Creating the Background Worker
Next, create the worker script at sandbox/worker.py:
Background Worker Code
#!/usr/bin/env python3
"""
RQ Worker for processing background jobs.

Usage:
    python sandbox/worker.py

This script starts an RQ worker that will process jobs from the 'background_jobs' queue.
Run this alongside your FastAPI application to handle background job processing.
"""

import os
import signal
import sys

# Add the project root to Python path so we can import our modules
sys.path.insert(0, os.path.dirname(os.path.dirname(os.path.abspath(__file__))))  # noqa

from redis import Redis
from rq import Queue, Worker

from sandbox.layers import setup_layers


def main():
    """Start the RQ worker."""
    print("🔧 Setting up channel layers...")
    setup_layers()

    print("🔗 Connecting to Redis...")
    # Use same Redis settings as in tasks.py
    redis_conn = Redis(host="localhost", port=6399, db=1)

    # Test Redis connection
    try:
        redis_conn.ping()
        print("✅ Redis connection successful!")
    except Exception as e:
        print(f"❌ Redis connection failed: {e}")
        print("Make sure Redis is running on localhost:6399")
        sys.exit(1)

    # Create queue
    queue = Queue("background_jobs", connection=redis_conn)

    print(f"🚀 Starting RQ worker for queue: {queue.name}")
    print("📋 Jobs will be processed as they arrive...")
    print("🛑 Press Ctrl+C to stop the worker")

    # Create worker
    worker = Worker([queue], connection=redis_conn)

    # Handle graceful shutdown
    def signal_handler(sig, frame):
        print("\n🛑 Shutting down worker gracefully...")
        worker.request_stop()
        sys.exit(0)

    signal.signal(signal.SIGINT, signal_handler)
    signal.signal(signal.SIGTERM, signal_handler)

    # Start working
    try:
        worker.work(with_scheduler=True)
    except KeyboardInterrupt:
        print("\n🛑 Worker stopped by user")
    except Exception as e:
        print(f"❌ Worker error: {e}")
        sys.exit(1)


if __name__ == "__main__":
    main()
This worker script:
Monitors Redis Queue: Continuously polls for new jobs to process
Channel Layer Setup: Initializes Fast Channels layers for result communication
Graceful Shutdown: Handles Ctrl+C and system signals properly
Connection Testing: Verifies Redis connectivity before starting
Error Handling: Provides clear feedback for connection and processing issues
Creating the Development Launcher
For easier development, create sandbox/start_dev.py to run both server and worker together:
Development Launcher Code
#!/usr/bin/env python3
"""
Development startup script that runs both FastAPI app and RQ worker.

Usage:
    python sandbox/start_dev.py

This will start:
1. RQ worker in the background
2. FastAPI application with live reload

Both processes will be managed together and stopped with Ctrl+C.
"""

import signal
import subprocess
import sys
import time


def main():  # noqa
    """Start both worker and FastAPI app."""
    print("🚀 Starting development environment...")

    # Store process references
    worker_process = None
    app_process = None

    def cleanup(signum=None, frame=None):
        """Clean up processes on exit."""
        print("\n🛑 Shutting down...")

        if worker_process:
            print("🔄 Stopping RQ worker...")
            worker_process.terminate()
            try:
                worker_process.wait(timeout=5)
            except subprocess.TimeoutExpired:
                worker_process.kill()

        if app_process:
            print("🌐 Stopping FastAPI app...")
            app_process.terminate()
            try:
                app_process.wait(timeout=5)
            except subprocess.TimeoutExpired:
                app_process.kill()

        print("✅ Shutdown complete")
        sys.exit(0)

    # Set up signal handlers
    signal.signal(signal.SIGINT, cleanup)
    signal.signal(signal.SIGTERM, cleanup)

    try:
        # Start RQ worker
        print("🔄 Starting RQ worker...")
        worker_process = subprocess.Popen([sys.executable, "sandbox/worker.py"])

        # Give worker a moment to start
        time.sleep(2)

        # Start FastAPI app
        print("🌐 Starting FastAPI application...")
        app_process = subprocess.Popen(
            [
                "uvicorn",
                "sandbox.main:app",
                "--host",
                "0.0.0.0",
                "--port",
                "8080",
                "--reload",
            ]
        )

        print("\n✅ Development environment ready!")
        print("📱 FastAPI app: http://localhost:8080")
        print("🔄 RQ worker: running in background")
        print("🛑 Press Ctrl+C to stop both services")

        # Wait for processes
        while True:
            # Check if either process has died
            if worker_process.poll() is not None:
                print("❌ RQ worker died unexpectedly")
                break
            if app_process.poll() is not None:
                print("❌ FastAPI app died unexpectedly")
                break

            time.sleep(1)

    except KeyboardInterrupt:
        pass
    except Exception as e:
        print(f"❌ Error: {e}")
    finally:
        cleanup()


if __name__ == "__main__":
    main()
This launcher script:
Dual Process Management: Starts both RQ worker and FastAPI server
Coordinated Shutdown: Stops both processes gracefully with Ctrl+C
Process Monitoring: Restarts if either process dies unexpectedly
Development Optimized: Includes live reload for the FastAPI application
Creating the Background Jobs Consumer
Now let’s create the WebSocket consumer that integrates with our background jobs. First, create the module structure:
# Create the background_jobs module directory
mkdir -p sandbox/apps/background_jobs

# Create __init__.py file to make it a Python module
touch sandbox/apps/background_jobs/__init__.py
Create a new file at sandbox/apps/background_jobs/consumer.py:
Background Jobs Consumer Code
"""
Background Jobs Consumer Template

This template shows how to integrate WebSocket consumers with background job processing.
Demonstrates real async job queuing and result delivery.

TODO:
1. Create your tasks.py file with job functions
2. Configure your job queue system (RQ, Celery, etc.)
3. Customize job types and processing logic
"""

import json

from fast_channels.consumer.websocket import AsyncWebsocketConsumer
from sandbox.tasks import queue_job


class BackgroundJobConsumer(AsyncWebsocketConsumer):
    """
    Consumer for processing messages with real background jobs.
    """

    # TODO: Configure your channel layer alias
    channel_layer_alias = "chat"

    async def connect(self):
        await self.accept()
        # TODO: Customize your welcome message
        await self.send("🔄 Background Job Processor: Connected!")

    async def receive(self, text_data=None, bytes_data=None, **kwargs):
        try:
            # Parse message if it's JSON, otherwise treat as plain text
            try:
                data = json.loads(text_data)
                job_type = data.get("type", "default")
                content = data.get("content", text_data)
            except (json.JSONDecodeError, AttributeError):
                job_type = "default"
                content = text_data

            # TODO: Customize your job queuing logic
            await self.send(f"⏳ Queuing {job_type} job: {content}")

            job_id = queue_job(job_type, content, self.channel_name)
            await self.send(f"📋 Job {job_id} queued successfully!")

        except Exception as e:
            await self.send(f"❌ Error queuing job: {str(e)}")

    async def job_result(self, event):
        """
        Handle job results sent back from background workers.
        TODO: Customize result processing if needed
        """
        await self.send(event["message"])

    async def disconnect(self, close_code):
        # TODO: Add cleanup logic if needed
        pass
Understanding the Background Jobs Consumer
Let’s break down how this consumer works:
- Message Processing:
Accepts both JSON and plain text messages
Extracts job type from JSON data (e.g.,
{"type": "translate", "content": "hello"})Falls back to “default” job type for plain text
- Job Queuing:
queue_job()sends work to background queue immediatelyReturns job ID for tracking
Consumer remains responsive during job processing
- Result Handling:
job_result()method receives results from background workersBackground workers use channel layers to send results back
Real-time delivery to the specific client that requested the job
- Channel Layer Usage:
Uses “chat” layer (same as room chat) for result communication
Background workers send messages to specific channel names
Enables cross-process communication between workers and WebSocket server
Integrating the Consumer
Connect the background jobs consumer to your FastAPI application. Open sandbox/main.py and uncomment these lines:
# Uncomment this import line:
from sandbox.apps.background_jobs.consumer import BackgroundJobConsumer

# Uncomment this WebSocket route:
ws_router.add_websocket_route("/backgroundjob", BackgroundJobConsumer.as_asgi())
These lines add a WebSocket endpoint at /ws/backgroundjob that handles background job processing.
Testing Your Background Jobs
Your final project structure should now look like this:
tutorial-project/
├── docker-compose.yml
└── sandbox/
    ├── __init__.py
    ├── main.py
    ├── layers.py
    ├── tasks.py
    ├── worker.py
    ├── start_dev.py
    ├── apps/
    │   ├── __init__.py
    │   ├── background_jobs/
    │   │   ├── __init__.py
    │   │   └── consumer.py
    │   ├── room_chat/
    │   │   ├── __init__.py
    │   │   └── consumer.py
    │   └── system_chat/
    │       ├── __init__.py
    │       └── consumer.py
    └── static/
        ├── css/
        │   └── style.css
        └── js/
            └── main.js
Stop any running servers:
If you have a server running from previous tutorials, stop it first (Ctrl+C) to avoid port conflicts.
Start the development environment:
# Use the development launcher (recommended)
python sandbox/start_dev.py

# OR start components separately:
# Terminal 1: python sandbox/worker.py
# Terminal 2: uvicorn sandbox.main:app --reload --port 8080
Test the background job processing:
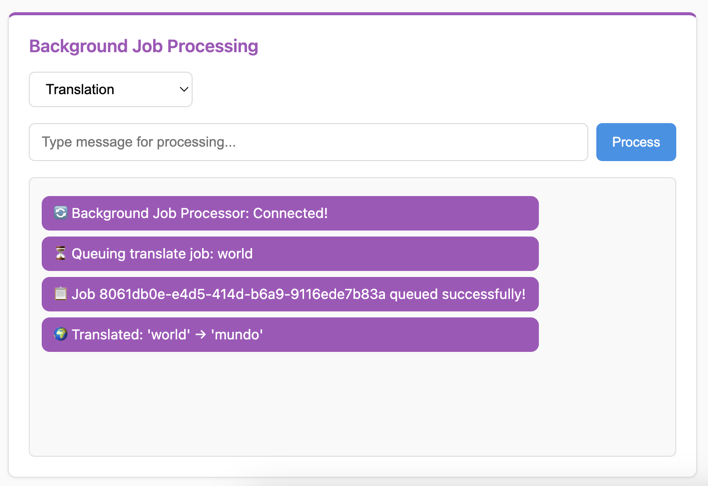
Visit http://localhost:8080 in your browser. You should see the “Background Job Processing” section.
Try different job types:
Select “Default Processing” and send a message
Select “Translation” and try words like “hello”, “world”, “thank you”
Select “Text Analysis” and send any text to get detailed analysis
Select “AI Generation” and mention topics like “weather”, “food”, or “help”
- Expected Behavior:
Immediate confirmation that job was queued
Job ID display for tracking
Real-time result delivery when processing completes
Different processing times for different job types (1-4 seconds)
Customizing Your Background Jobs
The system includes several areas for customization:
1. Adding New Job Types:
# In sandbox/tasks.py, add new job function:
def process_image(job_id: str, image_data: str, channel_name: str) -> dict:
    # Your image processing logic here
    time.sleep(5)  # Simulate processing
    result = f"🖼️ Processed image: {len(image_data)} bytes"
    _send_result_to_client(channel_name, result)
    return {"status": "completed", "result": result}

# Add to JOB_FUNCTIONS dictionary:
JOB_FUNCTIONS = {
    "translate": translate_text,
    "analyze": analyze_text,
    "generate": generate_response,
    "image": process_image,  # New job type
    "default": process_default,
}
2. Custom Job Processing Logic:
# In consumer.py, add preprocessing:
async def receive(self, text_data=None, bytes_data=None, **kwargs):
    # Add validation
    if not text_data or len(text_data.strip()) == 0:
        await self.send("❌ Empty message not allowed")
        return

    # Add rate limiting
    if hasattr(self, 'last_job_time'):
        if time.time() - self.last_job_time < 1:  # 1 second cooldown
            await self.send("⏳ Please wait before sending another job")
            return

    self.last_job_time = time.time()

    # Continue with normal processing...
3. Alternative Queue Systems:
Instead of RQ, you can use other systems:
# Celery example:
from celery import Celery

app = Celery('tasks', broker='redis://localhost:6379')

@app.task
def process_with_celery(content, channel_name):
    # Your processing logic
    result = f"Processed by Celery: {content}"
    _send_result_to_client(channel_name, result)
    return result

# In consumer:
def queue_job(job_type, content, channel_name):
    process_with_celery.delay(content, channel_name)
4. Enhanced Result Formatting:
# In tasks.py, customize result delivery:
def _send_result_to_client(channel_name: str, message: str):
    timestamp = datetime.datetime.now().strftime("%H:%M:%S")
    formatted_message = f"[{timestamp}] {message}"

    try:
        channel_layer = get_channel_layer("chat")
        async_to_sync(channel_layer.send)(
            channel_name,
            {
                "type": "job_result",
                "message": formatted_message,
                "timestamp": timestamp
            }
        )
    except Exception as e:
        print(f"Error sending result: {e}")
Troubleshooting
- Jobs Not Processing:
Make sure the RQ worker is running: check the terminal output from
python sandbox/start_dev.py- Results Not Appearing:
Verify Redis is running:
docker compose psshould show Redis container- Import Errors:
Ensure both import and route lines are uncommented in
sandbox/main.py- Worker Connection Failed:
Check Redis connection - worker uses port 6379 (standard), channels use 6399
- Slow Job Processing:
This is intentional - jobs have artificial delays (1-4 seconds) to demonstrate async processing
What’s Next?
Excellent! You’ve built a complete background job processing system with real-time WebSocket communication. You now understand:
✅ How to offload long-running tasks from WebSocket connections
✅ Background job queuing with Redis Queue (RQ)
✅ Cross-process communication using channel layers
✅ Real-time result delivery to specific clients
✅ Integration of sync workers with async WebSocket consumers
✅ Development workflow with coordinated server and worker processes
This pattern is essential for building scalable real-time applications that handle intensive processing without blocking user interactions. In the final section, we’ll explore advanced channel layer patterns and external integrations.
Continue to Showcase to learn advanced channel layer patterns and external integrations.