Room Chat
Multi-User Communication with Channel Layers
In this section, we’ll create a room-based chat system using channel layers. Unlike the simple echo consumer from the previous section, this consumer will enable multiple users to communicate with each other in real-time within specific chat rooms.
Understanding Channel Layers
Before we dive into building our room chat, let’s recap what channel layers are and why they’re essential for multi-user communication:
Channel Layers are the backbone of Fast Channels that enable communication between different WebSocket connections, even across multiple server processes. They act as a message routing system that allows:
Group Communication: Send messages to multiple WebSocket connections simultaneously
Cross-Process Messaging: Connect users even when they’re handled by different server instances
Scalable Real-Time Features: Build chat rooms, notifications, live updates, and more
Groups are collections of channels (WebSocket connections) that can receive messages together. When a user joins a chat room, their WebSocket connection joins a group. Messages sent to that group reach all connected users in the room.
Dynamic Group Management allows us to create rooms on-demand based on URL parameters. Users can join any room by visiting /ws/room/{room_name}, and the consumer automatically manages group membership.
Setting Up Channel Layers
Before we can use channel layers for room communication, we need to configure and register them. Channel layers must be set up once during application startup and before any consumers are created.
Create a new file at sandbox/layers.py to define our channel layer configuration:
Channel Layers Configuration
"""
Channel layer definitions and registration.
This file centralizes all channel layer configuration for the application.
"""

import os

from fast_channels.layers import (
    InMemoryChannelLayer,
    register_channel_layer,
)
from fast_channels.layers.base import BaseChannelLayer
from fast_channels.layers.redis import (
    RedisChannelLayer,
    RedisPubSubChannelLayer,
)

redis_url = os.getenv("REDIS_URL", "redis://localhost:6399")


def setup_layers():
    """
    Set up and register all channel layers for the application.
    This should be called once during application startup.
    """
    # Get Redis URL from environment or use default

    # Create different types of layers
    layers_config: dict[str, BaseChannelLayer] = {
        # In-memory layer for development/testing
        "memory": InMemoryChannelLayer(),
        # Redis Pub/Sub layer for real-time messaging
        "chat": RedisPubSubChannelLayer(hosts=[redis_url], prefix="chat"),
        # Redis Queue layer for reliable messaging
        "queue": RedisChannelLayer(
            hosts=[redis_url],
            prefix="queue",
            expiry=900,  # 15 minutes
            capacity=1000,
        ),
        # Notifications layer with different prefix
        "notifications": RedisPubSubChannelLayer(hosts=[redis_url], prefix="notify"),
        # Analytics layer for metrics/events
        "analytics": RedisChannelLayer(
            hosts=[redis_url],
            prefix="analytics",
            expiry=3600,  # 1 hour
            capacity=5000,
        ),
    }

    # Register all layers
    for alias, layer in layers_config.items():
        register_channel_layer(alias, layer)
This configuration file:
Defines Multiple Layer Types: Creates different channel layers for different purposes (chat, notifications, analytics, etc.)
Uses Redis Backend: Connects to our Redis instance running on port 6399
Registers Layers: Makes them available to consumers via aliases like “chat”, “queue”, etc.
Configures Different Behaviors: Some layers use pub/sub for real-time messaging, others use queues for reliable delivery
Important: This setup function must be called once during application startup and before any consumers are used. If you create external scripts or background workers that use Fast Channels, they must also call setup_layers() to initialize the channel layers.
Now we need to activate this configuration in our main application. Open sandbox/main.py and uncomment these lines near the top:
# Uncomment these lines:
from sandbox.layers import setup_layers
setup_layers()
These lines import and execute our channel layer setup, making all configured layers available to our consumers.
What We’re Building
A room-based chat consumer that:
Allows users to join specific chat rooms via URL parameters
Broadcasts messages to all users in the same room
Shows join/leave notifications when users connect/disconnect
Demonstrates channel layer group communication
Supports unlimited concurrent rooms
Creating the Room Chat Module
First, let’s create the room chat module structure:
# Create the room_chat module directory
mkdir -p sandbox/apps/room_chat

# Create __init__.py file to make it a Python module
touch sandbox/apps/room_chat/__init__.py
Your apps structure should now look like this:
sandbox/apps/
├── __init__.py
├── room_chat/
│   └── __init__.py
└── system_chat/
    ├── __init__.py
    └── consumer.py
Creating the Room Chat Consumer
Now let’s create our room chat consumer. Create a new file at sandbox/apps/room_chat/consumer.py and copy the consumer code from the tutorial template:
Room Chat Consumer Code
"""
Room Chat Consumer Template

This template demonstrates channel layers with dynamic room groups.
Users can join specific rooms and chat with others in the same room.

TODO:
1. Customize room group naming if needed
2. Add custom join/leave messages
3. Implement room-specific logic (permissions, etc.)
"""

from typing import Any

from fast_channels.consumer.websocket import AsyncWebsocketConsumer


class RoomChatConsumer(AsyncWebsocketConsumer):
    """
    Consumer for room-based chat where users can join specific rooms.
    """

    # TODO: Configure your channel layer alias
    channel_layer_alias = "chat"

    async def connect(self):
        # Extract room name from path parameters
        assert self.channel_layer
        self.room_name = self.scope["path_params"]["room_name"]
        self.room_group_name = f"room_{self.room_name}"

        await self.accept()

        # Join room group
        await self.channel_layer.group_add(self.room_group_name, self.channel_name)

        # TODO: Customize your join message
        await self.channel_layer.group_send(
            self.room_group_name,
            {
                "type": "room_message",
                "message": f"🚪 Someone joined room '{self.room_name}'",
            },
        )

    async def disconnect(self, code: int) -> None:
        # Leave room group
        assert self.channel_layer
        await self.channel_layer.group_discard(self.room_group_name, self.channel_name)

        # TODO: Customize your leave message
        await self.channel_layer.group_send(
            self.room_group_name,
            {
                "type": "room_message",
                "message": f"👋 Someone left room '{self.room_name}'",
            },
        )

    async def receive(
        self,
        text_data: str | None = None,
        bytes_data: bytes | None = None,
        **kwargs: Any,
    ) -> None:
        assert self.channel_layer
        # TODO: Add message processing/filtering logic here
        # Send message to room group
        await self.channel_layer.group_send(
            self.room_group_name, {"type": "room_message", "message": f"💬 {text_data}"}
        )

    async def room_message(self, event: dict[str, Any]) -> None:
        """
        Called when someone has messaged our room.
        """
        # TODO: Add message formatting/filtering here if needed
        await self.send(event["message"])
Understanding the Room Chat Consumer
Let’s break down the key concepts in this consumer:
- Channel Layer Alias:
channel_layer_alias = "chat"specifies which channel layer configuration to use. This references the “chat” layer we defined in oursetup_layers()configuration - a Redis pub/sub layer optimized for real-time chat messaging.- Dynamic Room Groups:
self.room_name = self.scope["path_params"]["room_name"]extracts the room name from the URL path (e.g., /ws/room/general → room_name = “general”)- Group Management:
group_add(group_name, channel_name)- Adds this WebSocket to a groupgroup_discard(group_name, channel_name)- Removes this WebSocket from a groupgroup_send(group_name, message)- Sends a message to all WebSockets in the group
- Message Flow:
User sends message →
receive()method calledMessage sent to group →
group_send()with type “room_message”All group members receive →
room_message()method calledMessage delivered to each user →
send()called
- Key Methods:
connect(): Join room group and announce arrivaldisconnect(): Leave room group and announce departurereceive(): Broadcast user messages to room grouproom_message(): Handle messages received from the group
Integrating the Consumer
Now we need to connect our room chat consumer to the FastAPI application. Open sandbox/main.py and uncomment these lines:
# Uncomment this import line:
from sandbox.apps.room_chat.consumer import RoomChatConsumer

# Uncomment this WebSocket route:
ws_router.add_websocket_route("/room/{room_name}", RoomChatConsumer.as_asgi())
- These lines:
Import our newly created
RoomChatConsumerAdd a WebSocket route at
/ws/room/{room_name}that captures the room name as a path parameter
- The route pattern
/room/{room_name}creates dynamic URLs like: /ws/room/general→ joins “general” room/ws/room/support→ joins “support” room/ws/room/team-alpha→ joins “team-alpha” room
Testing Your Room Chat
Your final project structure should now look like this:
tutorial-project/
├── docker-compose.yml
└── sandbox/
    ├── __init__.py
    ├── main.py
    ├── layers.py
    ├── apps/
    │   ├── __init__.py
    │   ├── room_chat/
    │   │   ├── __init__.py
    │   │   └── consumer.py
    │   └── system_chat/
    │       ├── __init__.py
    │       └── consumer.py
    └── static/
        ├── css/
        │   └── style.css
        └── js/
            └── main.js
Restart your FastAPI application:
# Stop the current server (Ctrl+C) and restart
uvicorn sandbox.main:app --reload --port 8080
Test the room chat functionality:
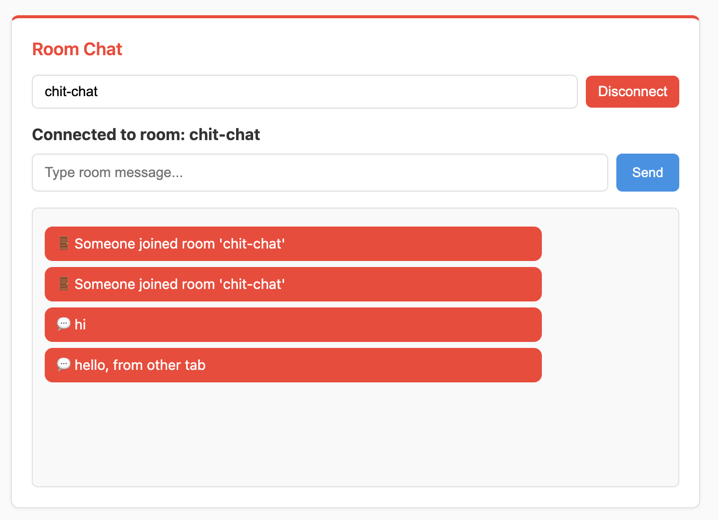
Visit http://localhost:8080 in your browser. You should see the chat interface with a “Room Chat” section.
Try the room features:
Enter a room name (e.g., “general”) and click “Connect”
Type messages and see them broadcast to the room
Open a second browser tab/window, join the same room, and see real-time communication
Try joining different rooms to see message isolation
- Expected Behavior:
Room connection shows current room name
Join/leave messages appear when users connect/disconnect
Messages from all users in the room are visible to everyone
Different rooms are completely isolated from each other
Customizing Your Room Chat
The consumer includes several TODO items you can customize:
1. Custom Room Group Naming:
# Current: room_general, room_support
self.room_group_name = f"room_{self.room_name}"

# Custom: chat_general, chat_support
self.room_group_name = f"chat_{self.room_name}"

# Namespaced: app_v1_room_general
self.room_group_name = f"app_v1_room_{self.room_name}"
2. Enhanced Join/Leave Messages:
# Add user information or timestamps
import datetime
timestamp = datetime.datetime.now().strftime("%H:%M")

await self.channel_layer.group_send(
    self.room_group_name,
    {
        "type": "room_message",
        "message": f"🚪 [{timestamp}] User joined room '{self.room_name}'"
    }
)
3. Message Processing and Filtering:
async def receive(self, text_data=None, bytes_data=None, **kwargs):
    # Add message validation
    if not text_data or len(text_data.strip()) == 0:
        return

    # Add user prefix or formatting
    formatted_message = f"💬 Guest: {text_data}"

    # Send to room group
    await self.channel_layer.group_send(
        self.room_group_name,
        {"type": "room_message", "message": formatted_message}
    )
4. Room-Specific Logic:
async def connect(self):
    self.room_name = self.scope["path_params"]["room_name"]

    # Add room validation
    allowed_rooms = ["general", "support", "team"]
    if self.room_name not in allowed_rooms:
        await self.close()
        return

    # Continue with normal connection...
    await self.accept()
Troubleshooting
- Room Messages Not Appearing:
Make sure Redis is running:
docker compose ps- Users Can’t See Each Other’s Messages:
Verify both users joined the same room name (case-sensitive)
- Import Errors:
Ensure you uncommented both the import and route lines in
sandbox/main.py- Channel Layer Not Found:
Check that your channel layer configuration is set up correctly (this should be handled automatically by the sandbox setup)
What’s Next?
Excellent! You’ve now built a multi-user chat system with channel layers. You understand:
✅ How channel layers enable multi-user communication
✅ Group management for organizing connections
✅ Dynamic room creation based on URL parameters
✅ Message broadcasting to multiple users simultaneously
✅ Real-time join/leave notifications
This demonstrates the power of Fast Channels for building scalable real-time applications. In the next section, we’ll integrate background job processing to handle long-running tasks while providing real-time updates to users.
Continue to Background Jobs to add background task processing with real-time updates.