System Messages
Your First WebSocket Consumer
In this section, we’ll create your first WebSocket consumer that handles simple client-server communication. This consumer will echo back whatever message the client sends, demonstrating the basics of WebSocket handling without channel layers.
What We’re Building
A simple echo WebSocket consumer that:
Accepts WebSocket connections from clients
Receives messages from the client
Echoes the message back with a server prefix
Handles connection and disconnection events
This is the simplest form of WebSocket communication - direct server-client messaging without any channel layer complexity.
Creating the App Structure
First, let’s organize our code by creating a modular app structure. This will help us separate different features as we build them.
Create the apps module structure:
# Create the apps module directory
mkdir -p sandbox/apps/system_chat

# Create __init__.py files to make them Python modules
touch sandbox/apps/__init__.py
touch sandbox/apps/system_chat/__init__.py
Your project structure should now look like this:
tutorial-project/
├── docker-compose.yml
└── sandbox/
    ├── __init__.py
    ├── main.py
    ├── apps/
    │   ├── __init__.py
    │   └── system_chat/
    │       └── __init__.py
    └── static/
        ├── css/
        │   └── style.css
        └── js/
        │   └── main.js
Creating the System Message Consumer
Now let’s create our first WebSocket consumer. Copy the consumer code from the tutorial template:
System Chat Consumer Code
"""
System Chat Consumer Template

This template shows how to create a simple WebSocket consumer without channel layers.
Perfect for direct client-server communication.

TODO:
1. Customize the connect() method with your welcome message
2. Add your own message processing logic in receive()
3. Handle disconnections if needed
"""

from typing import Any

from fast_channels.consumer.websocket import AsyncWebsocketConsumer


class SystemMessageConsumer(AsyncWebsocketConsumer):
    """
    Consumer for system messages without using channel layers.
    Direct connection without group messaging.
    """

    async def connect(self):
        await self.accept()
        # TODO: Customize your welcome message
        await self.send("🔧 System: Connection established!")

    async def receive(
        self,
        text_data: str | None = None,
        bytes_data: bytes | None = None,
        **kwargs: Any,
    ) -> None:
        # TODO: Add your message processing logic here
        # Example: Echo back system message directly without using layers
        await self.send(f"🔧 System Echo: {text_data}")

    async def disconnect(self, code: int) -> None:
        # TODO: Add any cleanup logic here if needed
        pass
Create this file at sandbox/apps/system_chat/consumer.py with the content above.
Understanding the Consumer
Let’s break down what this consumer does:
- AsyncWebsocketConsumer Class:
The base class for handling WebSocket connections. It provides methods for managing the WebSocket lifecycle.
- connect() method:
Called when a client establishes a WebSocket connection. We accept the connection using
await self.accept().- disconnect() method:
Called when the WebSocket connection is closed. We can perform cleanup here if needed.
- receive() method:
Called whenever the client sends a message. We receive the text, add a server prefix, and echo it back using
await self.send().- Key Points:
All methods are async and use
awaitfor I/O operationsself.accept()must be called to establish the connectionself.send()sends messages back to the clientNo channel layers needed for direct client-server communication
Customizing the Echo Response
The current consumer echoes back messages with a “Server echo: “ prefix. Try modifying the response in the receive() method:
async def receive(self, text_data):
    # Try different response formats:

    # Option 1: Add timestamp
    import datetime
    timestamp = datetime.datetime.now().strftime("%H:%M:%S")
    response = f"[{timestamp}] Server received: {text_data}"

    # Option 2: Transform the message
    response = f"You said: '{text_data}' - Message received loud and clear!"

    # Option 3: Simple echo with different prefix
    response = f"Echo: {text_data}"

    await self.send(text_data=response)
Feel free to experiment with different response formats to see how the WebSocket communication works.
Integrating the Consumer
Now we need to connect our consumer to the FastAPI application. Open sandbox/main.py and uncomment these lines:
# Uncomment this import line:
from sandbox.apps.system_chat.consumer import SystemMessageConsumer

# Uncomment this WebSocket route:
ws_router.add_websocket_route("/system", SystemMessageConsumer.as_asgi())
- These lines:
Import our newly created
SystemMessageConsumerAdd a WebSocket route at
/ws/systemthat uses our consumer
Testing Your System Messages
Your final project structure should now look like this:
tutorial-project/
├── docker-compose.yml
└── sandbox/
    ├── __init__.py
    ├── main.py
    ├── apps/
    │   ├── __init__.py
    │   └── system_chat/
    │       ├── __init__.py
    │       └── consumer.py
    └── static/
        ├── css/
        │   └── style.css
        └── js/
            └── main.js
Restart your FastAPI application:
# Stop the current server (Ctrl+C) and restart
uvicorn sandbox.main:app --reload --port 8080
Test the WebSocket connection:
Visit http://localhost:8080 in your browser. You should see the chat interface with a “System Messages” section.
Try sending messages:
Type a message in the “System Messages” input box
Click “Send” or press Enter
You should see your message echoed back with the server prefix
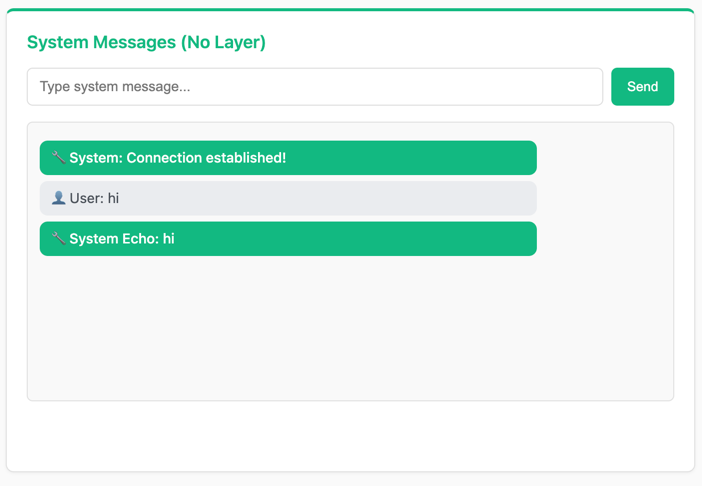
- Expected Behavior:
Your message appears as “User: [your message]”
Server response appears as “System Echo: [your message]”
Connection status shows “Connection established!” when WebSocket connects
Troubleshooting
- WebSocket Connection Failed:
Make sure you uncommented both the import and the route lines in
sandbox/main.py- Server Not Restarting:
If using
--reload, the server should restart automatically. If not, manually stop (Ctrl+C) and restart.- Import Errors:
Ensure all
__init__.pyfiles are created and the file paths match exactly.- No Messages Appearing:
Check the browser console (F12) for JavaScript errors.
What’s Next?
Congratulations! You’ve created your first WebSocket consumer. You now understand:
✅ How to create a basic WebSocket consumer
✅ The WebSocket lifecycle (connect, receive, disconnect)
✅ Direct client-server messaging without channel layers
✅ How to organize code with modular app structure
This is the foundation of real-time communication in Fast Channels. In the next section, we’ll add channel layers to enable communication between multiple clients in chat rooms.
Continue to Room Chat to build multi-room chat functionality.